Material nodes
Material nodes are a specific type of shader nodes, with the following differences:
their outputs cannot be connected in the material graph, but are used to generate image files when exporting
they define a preview shader used in the Preview Panel and to generate preview for the website
they define export targets for the material
There can be only one material node in a material graph.
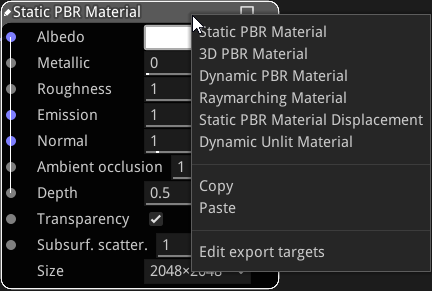
The type of material can be modified using the context menu. Custom material nodes can also be copied and pasted using this menu.
A material node can be made editable using the Control+W keyboard shortcut. This shows buttons to edit, load and save the node.
Editing a material node will show the Material Editor window.
Creating and modifying Material nodes
Material nodes have a node editor dialog similar to the shader node editor, with an additional Preview tab where a shader can be defined for the 3D preview of the material.
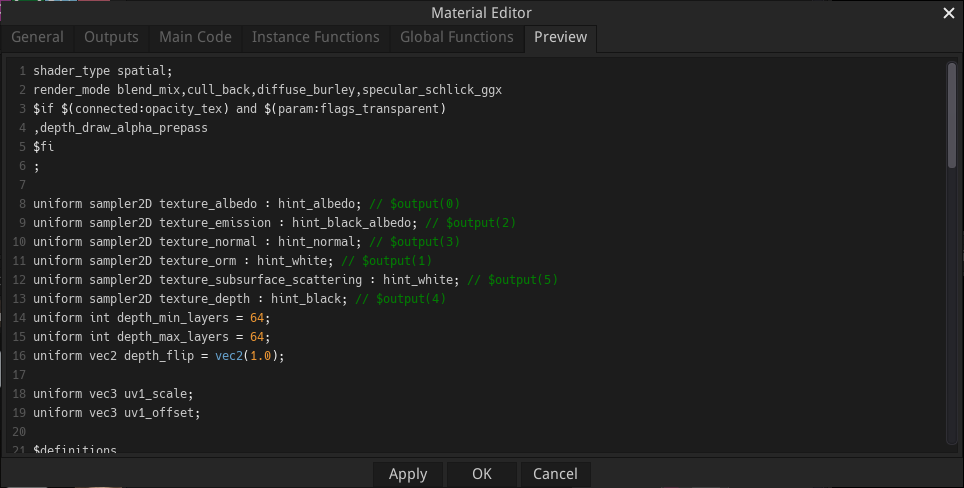
The preview shader must be specified using the Godot Shading Language for the 3D preview.
Specific directives can be used to insert code generated from inputs and parameters:
$if directives can be used to define conditional sections in the preview shader, and the conditional expressions can check parameter values (using the $(param:param_name) syntax) and if input ports are connected (using the $(connected:port_name) syntax).
uniforms of type sampler2D can be assigned a generated texture, defined by an output, specified by adding $output(output_index) as comment after the uniform declaration.
$begin_generate / $end_generate can be used to define sections where parameters and inputs (prtefixed with a $ character) are replaced with corresponding generated code.
$definitions can be used to generate all definitions (of uniforms, functions, etc.) necessary for all generated code.
Adding and modifying export targets
Material nodes can be assigned export targets to generate materials for various game engines and tools. Those export targets can be defined using the Edit export targets entry of the node’s context menu, that will show the Material Export Editor window.
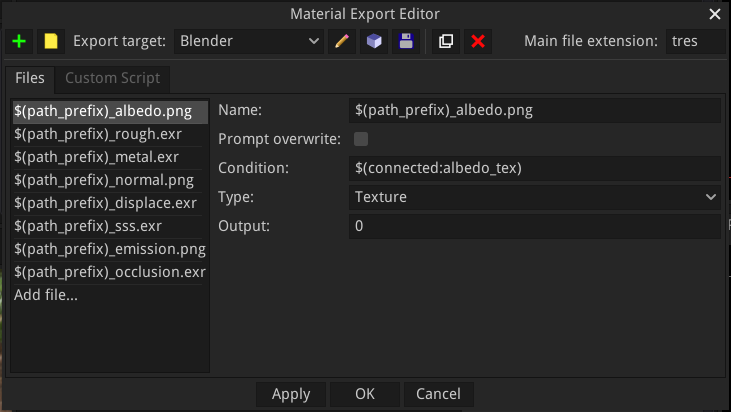
The Material Export Editor window consists of:
a toolbar where targets can be selected, duplicated, renamed, loaded and saved
an Export tab where export targets can be created with the definition of all files that must be generated
a Custom tab where text filter functions can be defined in GDScript to be used in the export templates
Export Editor Toolbar
The export editor toolbar has buttons and controls, from left to right, to:
Create a new export target
Load an export target from a file (this option does not check that the export target is suited for the current material, so it can exsily be used to adapt existing targets to another material node type)
Select the current export target
Rename the current export target
Specify if the current export target should be stored in the material or as a separate file (this option is only available for default material types)
Save the current export target to a file. Files saved using this option can be loaded using the load button of the Export Editor, or installed by dropping the file into the Material Maker application window
Duplicate the current export target
Delete the current export target
Select the - the current export target
Exports tab
The exports tab can be used to create export targets for the material.
Export targets can be created, removed, duplicated, and their main file extension defined.
For each export target, it is possible to define several generated files.
Each file has a name (where $(path_prefix) is replaced), and an optional condition that can be used to skip useless generated files. Supported conditions are in the form $(connected:input_name).
Files also have a Prompt overwrite option that makes it possible to not overwrite them when exporting (this is useful when you manually updated an exported material).
There are 4 types of generated files:
Texture files, that are defined by an output index or an expression that uses inputs and parameters of the material node. The corresponding output or expression will be rendered and saved as a file. Supported formats are PNG and EXR.
Template files are text files, modified using the following directives:
$begin_generate / $end_generate can be used to define sections where parameters and inputs (prefixed with a $ character) are replaced with corresponding generated code. Those sections accept a list of keywords that describe text filters to be applied to the section. Predefined filters are float_uniform_to_const, rename_buffers, unity, unreal…
$definitions can be used to generate all definitions (of uniforms, functions, etc.) necessary for all generated code. Filters are also accepted.
$if / $fi sections can be used to remove parts of the generated files, using the file condition syntax described above.
$begin_buffers / $end_buffers sections repeat their contents for each buffer used in generated shaders. In those sections, $(file_prefix) and $(buffer_index) will be replaced with their values.
Buffer files are similar to Texture files and are generated for each buffer used in generated shaders. In the file name, $(file_prefix) and $(buffer_index) will be replaced with their values.
Buffer templates are Templates defined for each buffer used in generated shaders.
Custom
The custom tab can be used to create custom text filters for $begin_generate / $end_generate and $definitions sections in GDScript.